


Table of contents
- Terminologies
- Kubernetes Namespaces 'N'
- Virtualization and Containers
- Types of Kubernetes Namespaces
- Default Namespace
- Viewing Namespaces
- Creating a New Namespace
- Hack to switch between Namespaces
- Deleting a Namespace
- Why Should You Use Kubernetes Namespaces?
- Using multiple Namespaces
- Use-case of multiple Namespaces
It's crucial to understand that Kubernetes namespaces are not the
same as Linux kernel namespaces.
Kernel and Namespaces divide operating systems into virtual operating
systems called containers.
Kubernetes Namespaces Divide Kubernetes cluster into virtual clusters,
which you might call Namespaces.
Before we dive into Namespaces, First, let's understand some terms.
Terminologies
Container
A container is nothing but a ready-made software package that contains everything needed to run an app from code to application
system libraries, default values for required settings, and any runtime it needs A
container holds everything.
Cluster
Each container runs on a cluster. It consists of a Control plane and computer machine nodes.
The control plane
Takes care of the applications running on the cluster and the resources they use, while the nodes are the machines on which the clusters run.
Orchestration
Ever seen an orchestra? The orchestra conductor decides what
sound he wants, how many violins, how many trumpets, what octave and everything else.
Similarly, orchestration determines which container to use
which resources to use, which application to run, etc.
Kubernetes comes from the Greek word meaning sailing master or pilot. Simply put
it means a person who has substantial control over operations.
This is what Kubernetes does.
It manages clusters, their deployment, scaling, etc.
Now let's dig into “Kubernetes Namespaces”
Kubernetes Namespaces 'N'
So What is Kubernetes Namespace?
With the help of Namespaces, each cluster is divided into virtual sub-clusters.
Each team can work in a Namespace without disturbing others.
An application and its dependencies are stored in Namespaces in a cluster.
These Namespaces are separate from each other but are allowed to communicate
with each other.
It's Namespaces that allow projects and team members to share a cluster.
Let us understand this by comparing how things have changed
and how these technologies are evolving
The process by which application development takes place.
Earlier resource allocation was a problem. An application consumes a
a lot of resources
This causes other applications to underperform. Organizations cannot
afford to deploy multiple physical servers.
Virtualization and Containers
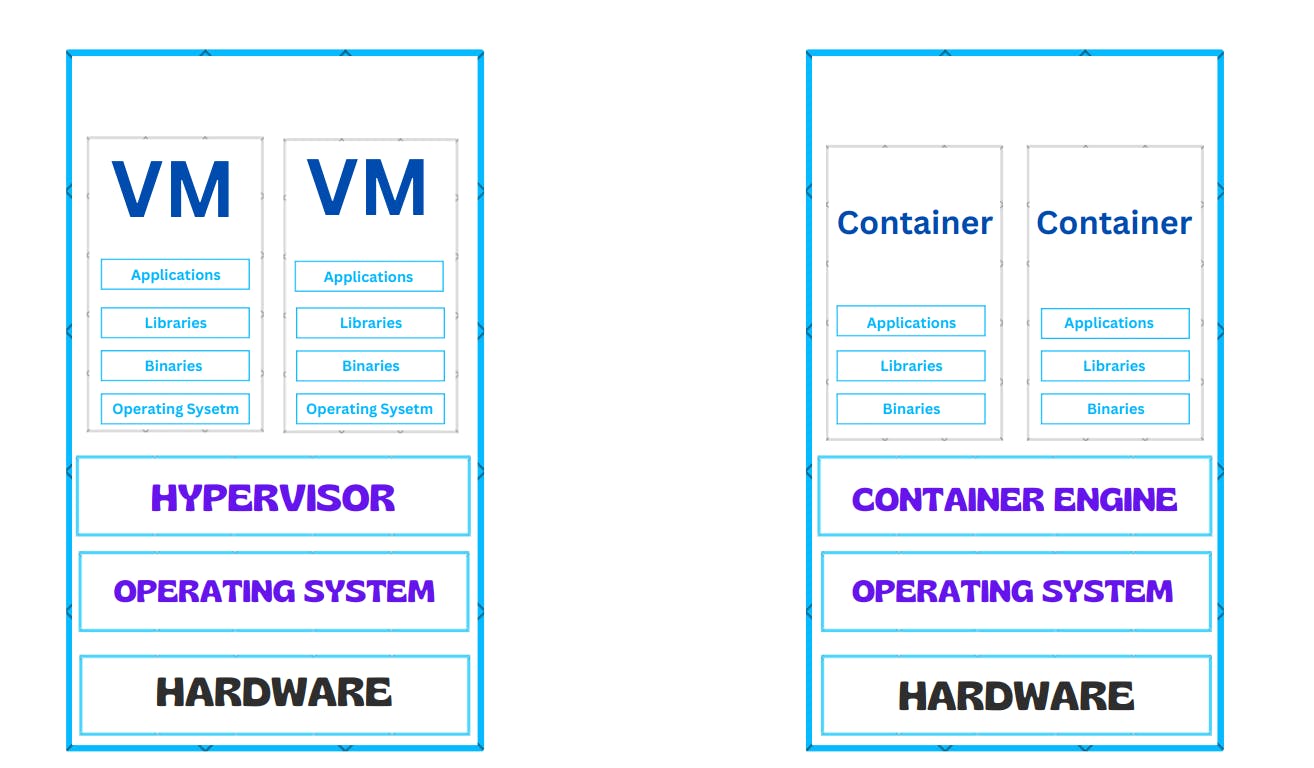
This is where the concept of virtualization came into the picture and
provided a viable solution to the above problem.
With the help of virtualization software, it is possible to run multiple
virtual machines on a single CPU.
This has saved organizations from the additional costs of purchasing
and maintaining additional hardware.
Virtualization also provides scalability as resources can be added
or removed at any time without disturbing other VMs.
It also demonstrated improved security as the VM was not accessed by other VMs.
This is the age of Kubernetes, where containers simplify application
development and make the whole process much simpler.
These containers are similar to virtual machines but are lighter. They relax
discrete features as they can be shared across multiple os, have
their own CPU space, memory, etc., and they are isolated
from their respective infrastructure.
Types of Kubernetes Namespaces
While writing this blog (Oct 3/ 2022) Kubernetes has four Namespaces,
this may change in future
default
it has a default Namespace for objects that have no other Namespace.
Pod
Services
Deployment...
kube-system
Namespace for Kubernetes system-derived objects.
Kube-DNS
Holds master process
kubectl process
kube-public
This Namespace is used for resources that should be publicly available
to all users.
Cluster-info
ConfigMap
kube-nodelease
Used to track the health of the node
- Allocated to each node(object)
Default Namespace
This is a Namespace automatically created by Kubernetes.
This Namespace includes pods, services, and deployment
Can be accessed by every user (even unauthenticated ones).
Viewing Namespaces
You can see your current Namespaces using the following command:
kubectl get namespaces
This lists your current Namespaces, their status, etc.
Command to get more info about a particular Namespace
Get Kubectl Namespaces
We can also get a detailed description of a specific Namespace by using
the following command:
Kubectl describes the Namespace
Description Shows resource quota (if specified) and resource range, A
resource quota shows the total resources a Namespace can use
And the resource range shows the minimum or maximum
resources that can be consumed.
It also shows whether the Namespace is active or terminating.
These are the two designations of any Namespace.
The active Namespace is in current use, while the terminating
Namespace is being dropped and is no longer in use.
Creating a New Namespace
We can create a new Namespace in two ways:
Imperative way
-> You can simply run the command:
kubectl create Namespace
Declarative way
We can also create a YAML file with the following contents:
Newspace.yaml:
kind: Namespace
apiVersion: v1
metadata:
name: newspace
labels:
name: newspace
kubectl apply-f newspace.yaml
It is easy to create a new Namespace.
How to share a cluster with Namespaces?
A Namespace allows teams to share a Kubernetes cluster, it allows you to create Virtual cluster's inside the existing cluster
Although your current environment is not changed to your new namespace
it's time-consuming and also not efficient to type --namespace with
kubectl command always
Let's see a simple hack, how you can switch your current default Namespace
to your preferred Namespace
Hack to switch between Namespaces
The command to view Namespaces
kubens
To switch Namespaces
kubens newspace
That's it, now all your commands only work within your newspace Namespace
How to switch back, it's so simple
kubens default
Deleting a Namespace
Delete any particular Namespace by using this command:
Kubectl delete Namespace
After the command is executed, Namespace will pop up a “Terminating”
status for a while.
Congratulations Now, you can create, view, or delete Namespaces.
Why Should You Use Kubernetes Namespaces?
it's time to understand why Kubernetes Namespaces are crucial and
what are their advantages:
A Namespace is used by a specific team, which increases the sense of
accountability through better role-based access control.
Namespaces allow teams to work in their respective bubbles without
interfering with and disrupting others.
With Namespaces, it is possible to carry out the development, testing, and
production of applications in different containers.
A resource quota divides the number of resources that users and teams
can use.
Using multiple Namespaces
In smaller organizations, where development, testing, and production
teams work side by side, the default Namespace is sufficient.
Development and testing do not require isolation and, therefore, can
work with a single default Namespace.
But if the team is large or expanding day by day, multiple Namespaces
will be required.
Use-case of multiple Namespaces
Development and testing can be clustered as one team, and production
can be isolated so that any changes made by development and
testing do not affect production.
Throughout the entire lifecycle of the application, both teams can work in
their respective Namespaces.
Thank you for reading my blog. If you like my work feel free to connect me on LinkedIn or Twitter, see you with another one guys.